NOTE: Scroll down if you are just looking for solutions to problems with this bike.
NOTE: This bike does not come with a kickstand. Google “adjustable kickstand” and pick one up. They are $7 at Target.
Empty-Grave Review
My sons (4 & 6) are eager to be on two wheels so we went shopping for bikes. We wound up at Toys R Us and my sons wanted the same bike. The store only had the floor-model (of course), and that looked like it had been around the block a few times, so I decided to order online and assemble the bikes myself.
Both bikes arrived undamaged and with all the required parts, although after I assembled the first one I discovered neither bike had a kickstand–apparently a common practice on children’s bikes. Buy an adjustable kickstand, preferably before assembling the bike as it is handy to have the bike stand on its own as you put the seat and handlebars on.
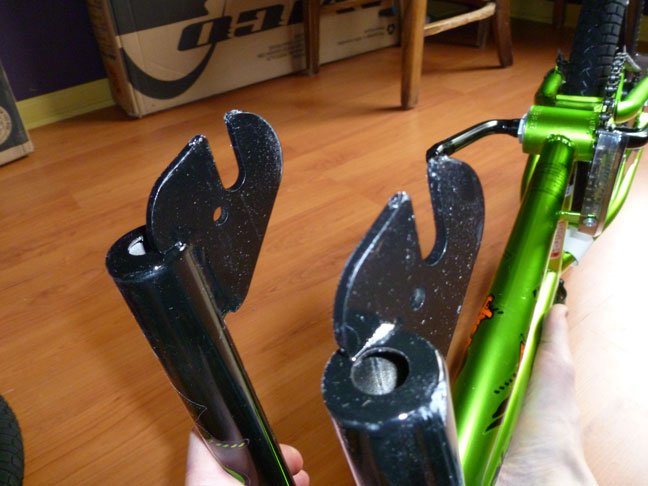
I quickly discovered the first major problem with this bike. The Y-Fork that secures the front wheel to the bike chassis was not wide enough to fit where it was supposed to on the front axle. After much frustration I jimmied it on with a flat-head screwdriver for the first bike. The second bike, though, was so far off I had to use a 2×4 to bend the steel fork enough to fit the wheel on. Scroll past the review to see photos and the solution.
The brake cables for the handbrakes were way too long and, even properly routed, they were hanging out all over the place. Since my sons were both used to just coaster brakes I decided to remove the handbrakes and put them on at a later date when they were both comfortable riding two-wheelers. That led to the second major problem–the hand-grips, which might as well have been glued on, had to be removed to remove the brakes. That was a blister-inducing ordeal. Although not that big of a problem, the back brake line is also routed through a steel hole on the chassis that is just large enough for the cable’s girth so I had to cut off the nub at the end of the excess line to get it to feed through.
The bike isn’t all problems though. The tool-less adjustment of the seat height was extremely nice and when I took off the reflector the seat actually went down low enough to accommodate my smallish children. The handlebars went on easily and the final assembled product feels sturdy and looks great. The $79.99 price-tag was also well under most of the other offerings. If you want to save yourself the hassle you can purchase an assembled model for $10 more at one of the Toys R Us stores, although I recommend you read the instructions and go over the bike yourself and tighten all the nuts anyway because the bikes on display in the store were not all assembled correctly.
Solutions to Model-Specific Problems
Chassis Y-Fork Issue
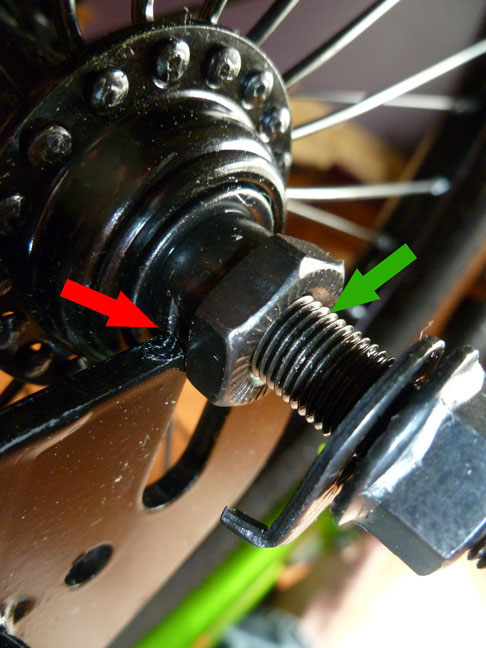
The chassis Y-fork gap is not wide enough for the wheel axle. It appears that the C-shaped plates are supposed to go on the innermost part of the screw post since that is the only way they fit but they are actually supposed to go on the threaded part of the screw post–the fork is just not wide enough for that to happen. The gap on my first bike was only off about a 1/4″ but on the second bike it was off nearly 3/4″. The red arrow below shows where your Y-fork probably fits. The green arrow shows where it is supposed to go.
I fixed this issue on the first bike by using a flat-head screwdriver to lever the C-shaped plate over to the threaded area. The gap was so wide on the second bike, though, I had to brace it by placing a board over one prong of the fork, standing on that board, and using the leverage of a short 2×4 to bend the steel a bit. A little goes a long way so make sure you check the gap frequently. My gap wound up being a little wider than it was supposed to be but the locking-nuts tightened it up regardless.
The Handlebar Grips Won’t Come Off
If you decide to remove or change the handbrakes or even just change the hand-grips themselves I’m sure you’ll find that the existing hand-grips might as well be super-glued in place. After quite a few blisters and blown forearms I found that running the rubber grip under scalding hot water for a while causes the rubber to expand a bit. When heated up, the grip can be simultaneously twisted and pulled off with about a tenth the effort.
- $79.99










{ 11 comments… read them below or add one }
im trying to install the handlebar for 18″ BOYS ONE-EIGHT FREESTYLE BIKE ,item # 038553 , and i dont get it ,instruccions dont tell me how ,could you please thelp me.
Hi Franklin. Not sure if you still need help on that but I’m assuming you’re having trouble with the handlebars swiveling left and right. If so, you want to focus your attention on the silver bolt that is just below the four-bolt-square at the base of the handlebars. Tightening that bolt expands a metal cylinder lower down the frame. You just have to tighten that bolt until the handlebars no longer swivel. It may seem like you are over tightening the bolt but you have to keep going until you can’t jerk the handlebars crooked. If your problem is with the handlebars pushing forward or back then you need to tighten the four bolts in a square just above. Cheers!
Does this bike have 18 ” wheels? I can’t tell. Thanks.
Hi Bryan. Yes, this model of Avigo does have 18″ wheels. Had the bikes for two years now and they are still holding up well.
I dont get it after dealing with the above problems the yoke where the peddles do in (where the bearings are) was loose after him riding it a week so I took it apart and tightened it but it apears theres something no idea what its called on the rear wheel where the chain rides and it constantly slips the chain is tight and so is everything else so why is this slipping? its impossible fo the little boy to ride now and Im aggravated as hell. does anyone know what this is or how i can adjust it?
Hi Jim. I’m definitely no expert on bikes but when I looked at the rear tire of my son’s bike I noticed that the axle bolts can be loosened to slide the rear tire closer to the front of the bike. That is how you ultimately install and tighten the chain. I’m thinking that your rear axle bolt may be loose which is pulling the whole rear tire assembly forward a bit and causing the chain to slip. If that’s the case try loosening the rear axle bolt and making sure the chain is properly in place. Then pull the rear tire as far BACK as it will go and tighten the axle bolts again. That should make the chain so tight it will be unable to slip or fall off.
If that doesn’t help you can email me a photo or post one on Google Drive or something and I can see if yours looks different than mine. Good luck!
Adam, you are a genius! I bought the Avigo 18 inch Filter model bike. I had the same issue with the Y or U bar for the front wheel. They made it too tight for the wheel to pop on, I used your 2 by 4 technique and it worked. If you call the customer service line they will send you a new Y or U bar in about 10-12 business days and who knows if that will fit. Thanks Adam
Thanks for the compliment! Glad it worked out for you. Now I just need a way to get the kids to ride bikes instead of playing video games
Glad I found this write-up. I have the exact same problem with the narrow front fork on my daughter’s Rallye (by Huffy). It’s about 1/2 inch too narrow, as your red/green arrows show perfectly. Ridiculous that they are packaging bikes like this, but I’m glad to see that expanding the fork didn’t compromise the integrity of the frame for your kids’ bikes.
Hi Jay. Thanks for the comment! I’m surprised to see they still haven’t fixed that design flaw after all these years though…
Hi,
I bought this same model in July for my 5 yr. I am not sure what is wrong with the bike, the crankarm is so tight and caused this so hard to move. I had different kids tried everyone said too hard to ride on it. We spray some W40, it doesn’t help much.